Easy Summer DIY Projects
Hey everyone! Nothing cheers up a summer-less summer like freshening up your home! DIY projects are my favorite type of home improvement project because there's nothing quite as satisfying as actually building something for yourself. These projects only need an hour or two to complete and are simple enough that you don't need any crafting experience to be successful!
I find DIY projects super relaxing as well. Keeping your hands busy gives your mind time and space to wander awhile, which is always healthy. Grab a speaker, put on your favorite podcast or playlist, make a nice iced drink and get ready for a chill and artsy afternoon!
Painted Wooden Dresser

First, let’s paint that beat up old wooden dresser you’ve had since you were 5! Or maybe it came from the dumpster behind an apartment complex, like mine. Either way, it’s old, wooden and a little bit of an eyesore. A fresh coat of paint can take it from the piece of furniture you try to disguise and turn it into a cohesive part of the room.

Materials
- Dresser
- Sandpaper
- Paint - with primer & semi-gloss finish
- Paintbrushes
- Screwdriver
- Drip Cloth
To pick your paint, head to your local hardware store and find some paint chips. Paint colors look a lot different in the store lighting versus your home lighting, so pick out a variety of paint chips, including colors you don't even think you'll consider, bring them home and see what you like. I ended up choosing a gorgeous minty green (called "pinyon pine") that nicely compliments my wall color and other furniture. Per the advice of the gentleman working at the hardware store, I got paint that includes a primer with a semi-gloss finish. Primer helps paint adhere to the surface and makes the color pop a little more but if your paint doesn't have a primer, you can either buy it separately or just add a couple extra coats. The semi-gloss finish gives the paint a subtle shine, keeps it smooth to the touch and makes it easier to clean up any spills. I used Best Look paint, but any hardware store brand will work great.
I did all my painting outside, but if you paint inside, remember to lay down a drip cloth!

1. Use a screwdriver to take knobs off drawers.
2. Sandpaper scratched up parts with a rougher grain sandpaper.
3. Use painters tape to line the edges of the drawers/anywhere you want a clean line. I debated doing this and I’m really glad I did; it gives a really clean look at the end that’s super satisfying.

4. Paint! If you're using a separate primer, do that first.
5. Add a second coat
6. After paint is dry, screw knobs back on, or put new knobs on if you're not a fan of your old ones.
Things I wish I knew
- Paint inside the dresser around the drawers - as you can see above, I originally didn't paint enough on the inside of the dresser body so when the drawers were shut I could see unpainted parts.
- Splurge a brush that costs at least $1.50. Cheap brushes are great, but mine was only $.50 and shed bristles all over the place as I was painting.
- If you paint outside, remember to put sunscreen on!

|
 |

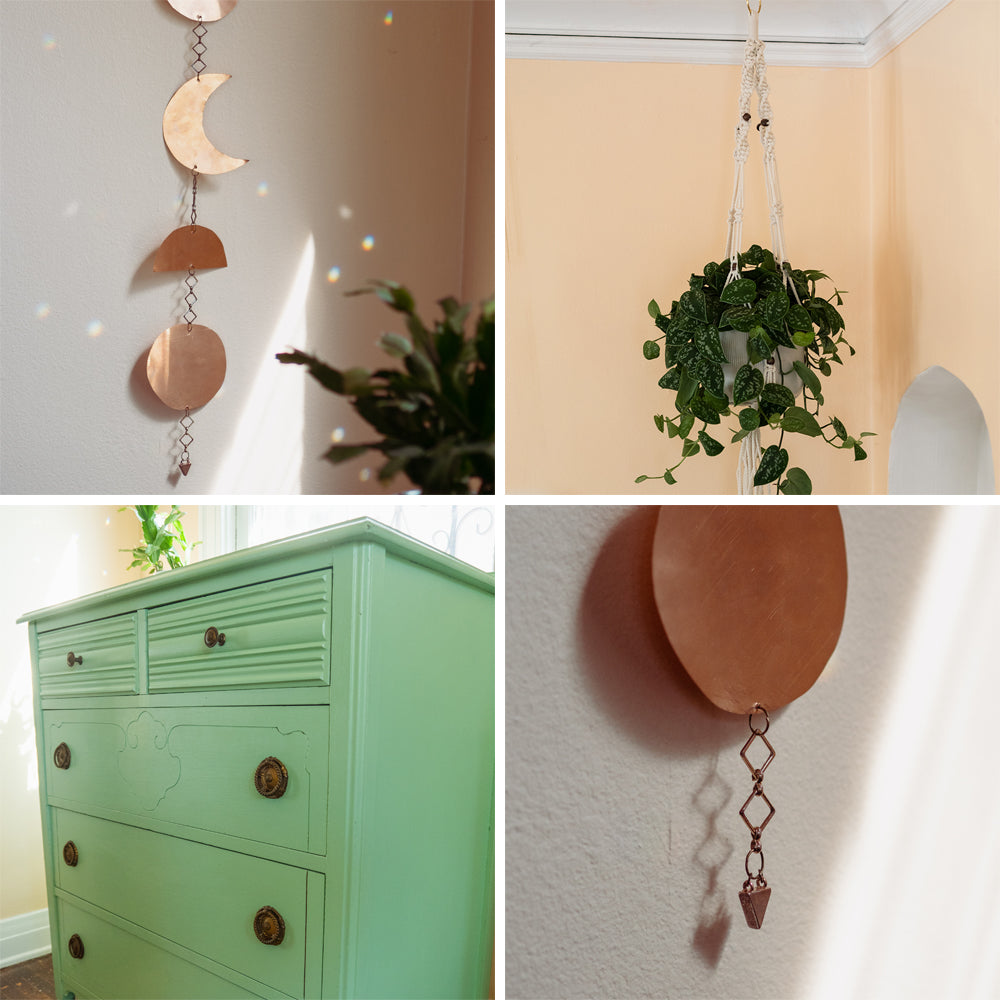
Macrame Plant Hanger

Macrame is an ancient art form that had a resurgence with the hippies in the 70s and is back again now in every Instagramer's OOTD shot. If you don’t have any plants to fill your macrame, buy a few! You can buy nearly any house plant from Etsy shops like The Plant Farm or Honey Plant Co. or other online stores like Logees. Even better, check out your local nurseries. Hardware stores, grocery stores and actual nurseries are all great places to find a cool plant.
I've never done any macrame before and I had a little trepidation about the whole thing which was reinforced when my first attempt looked like a string of knots. It took me a few times knotting and unknotting, but once I got the feel of it, it went really smoothly. I made my hanger using literally only three types of knots: gathering knot, square knot and twisting knot. I added a few beads but kept the whole design really simple, but you can make your hanging as detailed as you like.

Materials
- 4 mm macrame cord (I used this one in Lamb's Wool)
- Assorted wooden beads (like these)
- 2” ring (wooden or metal)
To start your macrame:
- Measure 8 pieces of cord at ~15 feet. If you want to make a longer or more complicated macrame, make each piece 18 feet.
- Cut one more piece that's about 2 feet long
- Follow steps 1-8

Start your hanging by creating a gathering knot:
- Loop cord through ring, folding in half at the middle for 16 cords total
- Take 2' cord and create a small loop
- Wrap cord around itself, leaving a tail at the top
- Wrap snuggly about 15 times
- Pull end through loop
- Tighten both loose ends, pulling the knot inside wrapped area
- Gathering knot is complete, trim loose ends
- Split 16 cords into 4 groups of 4

The remainder of the macrame hanger is up to you! I made mine entirely with spiral and square knots, which I have directions for below. You can add beads as you like; I liked mine best in between two square knots. In the pictures below, spiral knots are on the left and square knots on the right.

Spiral Knot

- Take outer right cord, create loop and cross over two middle cords, under outer left, leaving a loop
- Pull outer left cord under middle two and up through outer right loop
- Pull snug
- Repeat, always starting with the outer right cord
Square Knot

- Same as the spiral knot, take the outer right cord, pass it over the middle two cords and under the outer left
- Pass outer left through outer left loop
- Repeat, starting with outer left cord, pass it over center two and under the outer right
- Pass outer right cord under middle two and up through the loop
- Pull snug and repeat, alternating right and left starting cords
I didn't follow a pattern, but the hanger I made followed these steps:
- Spiral knot x20
- Square knot x2
- Bead
- Square knot x2
- Square knot x ~3”
- Bead
- Spiral knot x ~2”
Once each of your four sections are the length you want them, add another spiral knot at the end, trim your cords and fray the ends a little!
For more detailed instructions, I found this video super helpful!
Things I wish I knew
- Spiral/square knots always start with the outer cord!
- I put a few beads in my spiral knots and don't love how they look; they lay flatter when they're surrounded by square knots.

|
 |
Moon Hanging

This moon hanging is a great way to add a little rustic, boho feel to your home! It’s super simple to make yet looks like something you’d find at Urban Outfitters or Anthropology. I found some chain at Joann’s but ended up using an old choker necklace from Forever21. The pendant I used is from another old necklace.

Materials
- Sheet metal
- Jump rings
- Chain
- Pendant
- Pliers
- Scissors or metal cutter
- Sandpaper
- Something round to trace, i.e. roll of masking tape, sour cream container lid
- Paper
- Pencil
- Hole punch (or a hammer and large nail)

Instructions
- Trace and cut out moon shapes on paper. I used a roll of tape for the full moons, and a slightly larger roll of tape for the crescent in the middle.
- I cut out a couple different versions of the hanging with paper shapes so I could lay them out and see which one I wanted in metal.
- Trace shapes onto metal. I used the sharp point of a knife, but a felt pen also works.
- Cut out shapes in metal. I was able to cut the metal with a scissors; go slowly and be careful of any jagged edges.
- Carefully sandpaper the edges of the metal pieces; you can sandpaper the flat sides of the pieces if you want a more rustic look.
- Punch holes in the top and bottom of each metal piece. I hammered a nail through the metal but you could also use a hole punch.
- Cut chain into 6, approx. 2 inch pieces.
- Use the jump rings to connect moon and chain pieces.
- Hang pendant on the end.
Things I wish I knew
- I had a hard time finding sheet metal and ended up getting mine from a construction supply company here, but you can also find metal at online jewelry stores, like WireJewelry.com or at craft stores like Michaels.
- Make sure your jump rings are snug; my hanging fell apart a few times while trying to hang it up.

Happy crafting! Tag us on Instagram @shopshoetopia or with the hashtag #shopshoetopia with any of your DIY creations!
-xx Laura